Get started quickly
Our Content Toggle module plugin can help you to create content toggle switches simply and quickly.
1. To get started quickly, please refer to the main tutorial:
How to to use Content Toggle Demo
How to to use Toggle Switches Setting Demo
6 Cases Tutorial for Toggle Swith Style setting, please refer:
Toggle Swith Style setting Cases
2. Content Toggle Plugin supports two kind of content to switch:
- One is Content Text
Go to Content >> Content Toggle Left ( or Content Toggle Right ) in Module Settings.
Select Text in Content Left Type ( or Content Right Type ) , then input content text in text area.
For more usage of Content Text in module, please refer:
- The other one is Content Layout
Go to Content >> Content Toggle Left ( or Content Toggle Right ) in Module Settings.
Select Divi Library Layout in Content Left Type ( or Content Right Type ) .
Click Select Divi Layout in Select Layout, then browse layouts in your Divi library and choose which you want to show.
For more usage of Layout in module, please refer:
3. Free download Demo layouts:
- Content Toggle Demo
Download from:
For the usage, please refer to the tutorial:
How to to use Content Toggle Demo
- Toggle Switched Setting Demo
Download from:
For the usage, please refer to the tutorial:
How to to use Toggle Switches Setting Demo
How to Install plugin
Download zip file
Buy the plugin from url:
https://www.elegantthemes.com/marketplace/content-toggle-module-for-divi/
Before installing the Content Toggle Plugin on your website, you need download the menx-content-toggle.zip file from elegantthemes.com.
Install and active plugin
Go to WordPress Dashboard >> Plugins >> click Add New Plugin
Then click Upload Plugin >> Choose File browse the menx-content-toggle.zip file and select it >> install now
After the plugin is installed, click Activate Plugin.
Once the plugin is activated, the Menx Content Toggle module will be shown in the Divi Builder with other Divi modules.
How to use plugin
Enable Visual Builder
Click on Enable Visual Builder to edit the content toggle in visual view.
Add New Module
Click Add New Module to add module.
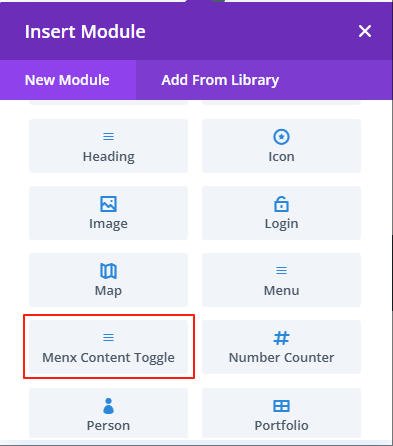
Search “content toggle” in Insert Module and click Menx Content Toggle module to add the new module.
Edit Module
Click Module Settings to edit the module.
Click Content to edit toggle content.
Click Design to edit toggle style.
How to edit toggle Switch
Toggle Left Title
Go to Content >> Content Toggle Left in Module Settings, input your toggle title in Toggle Left Title.
Toggle Right Title
Go to Content >> Content Toggle Right in Module Settings, input your toggle title in Toggle Right Title.
Toggle Title Fonts
Go to Design >> Toggle Title Text in Module Settings, then edit the font style.
Toggle Title Margin
Go to Design >> Toggle Title Margin in Module Settings, then edit the margin of the toggle left and the margin of the toggle right.
Set toggle switch style
Go to Design >> Toggle Switch Style in Module Settings, then edit the Switch Alignment, Switcher Size, Toggle Switch padding.
Edit border radius and style
Edit box shadow
Set toggle switch background color & Hover
Go to Design >> Toggle Switch Style in Module Settings.
1. Switch Left Background color:
Go to Switch Left Background >> Color >> Add Background Color
2. Switch Left Background color: gradient
Go to Switch Left Background >> Gradient >> Add Background Gradient
3. Switch Left Background color: Hover
Go to Switch Left Background >> Add Hover >>Hover>>Add Background Color or Gradient
4. Switch Right Background color
Go to Switch Right Background >> Color >> Add Background Color
Click Toggle Button to switch to right side to see the Switch Right Background color.
5. Switch Right Background color: gradient
Go to Switch Right Background >> Gradient >> Add Background Gradient
Click Toggle Button to switch to right side to see the Switch Right Background gradient color.
6. Switch Right Background color: Hover
Go to Switch Right Background >> Add Hover >>Hover>>Add Background Color or Gradient
Go to Design >> Toggle Switch Round Button Style in Module Settings, then edit border radius, border style.
Edit Switch Round Button box-shadow
Go to Design >> Toggle Switch Round Button Style in Module Settings.
1. Background color
Go to Switch Round Button Background >> Color >> Add Background Color
2. Background Gradient
Go to Switch Round Button Background >> Gradient >> Add Background Gradient
3. Background When Hover
Go to Switch Round Button Background >> Gradient >> Add Background Gradient
How to edit Content Text
Content Left Text
Go to Content >> Content Toggle Left in Module Settings.
Select Text in Content Left Type, then input content text in text area.
Content Right Text
Click Toggle Switch to right side.
Go to Content >> Content Toggle Right in Module Settings.
Select Text in Content Right Type, then input content text in text area.
Content Left Fonts
Go to Design >> Content Left Text in Module Settings, set the font style and color.
For edit the content style, please refer:
Content Right Fonts
Click Toggle Switch to right side.
Go to Design >> Content Right Text in Module Settings, set the font style and color.
For edit the content style, please refer:
How to create your layout
Create your Layout
There are two ways to create your layout:
- One way is Demo layout
Import and edit the Demo layout we provide: Content Toggle Demo
Download from:
For the usage, please refer to the tutorial:
How to to use Content Toggle Demo
- The other way is to create your own layout
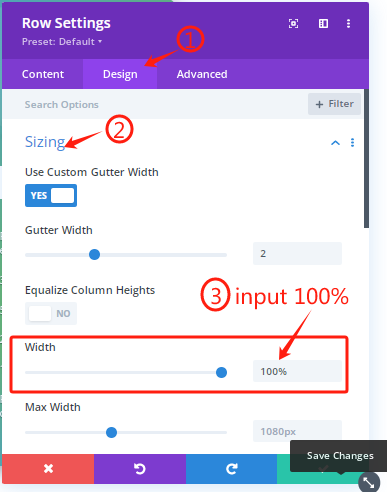
- Divi Row layout: Click the green-blue plus button to add a new row. Then create the layout from Divi Row layout by yourself, suggest setting the Width of Row : 100%.

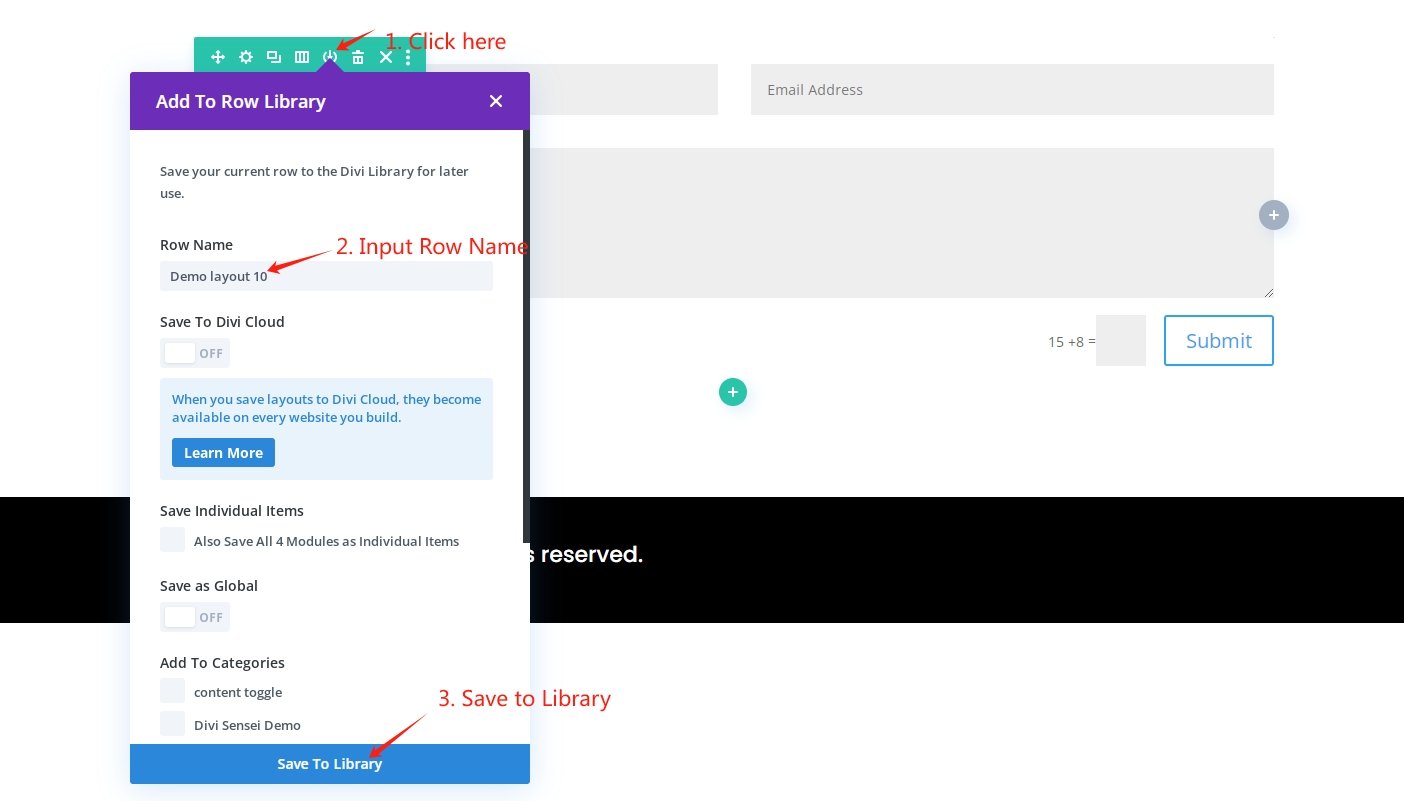
Save the layout and Add To Row Library. Then you can import it to the content left or right layout in Content Toggle module.
2.Divi Module layout:
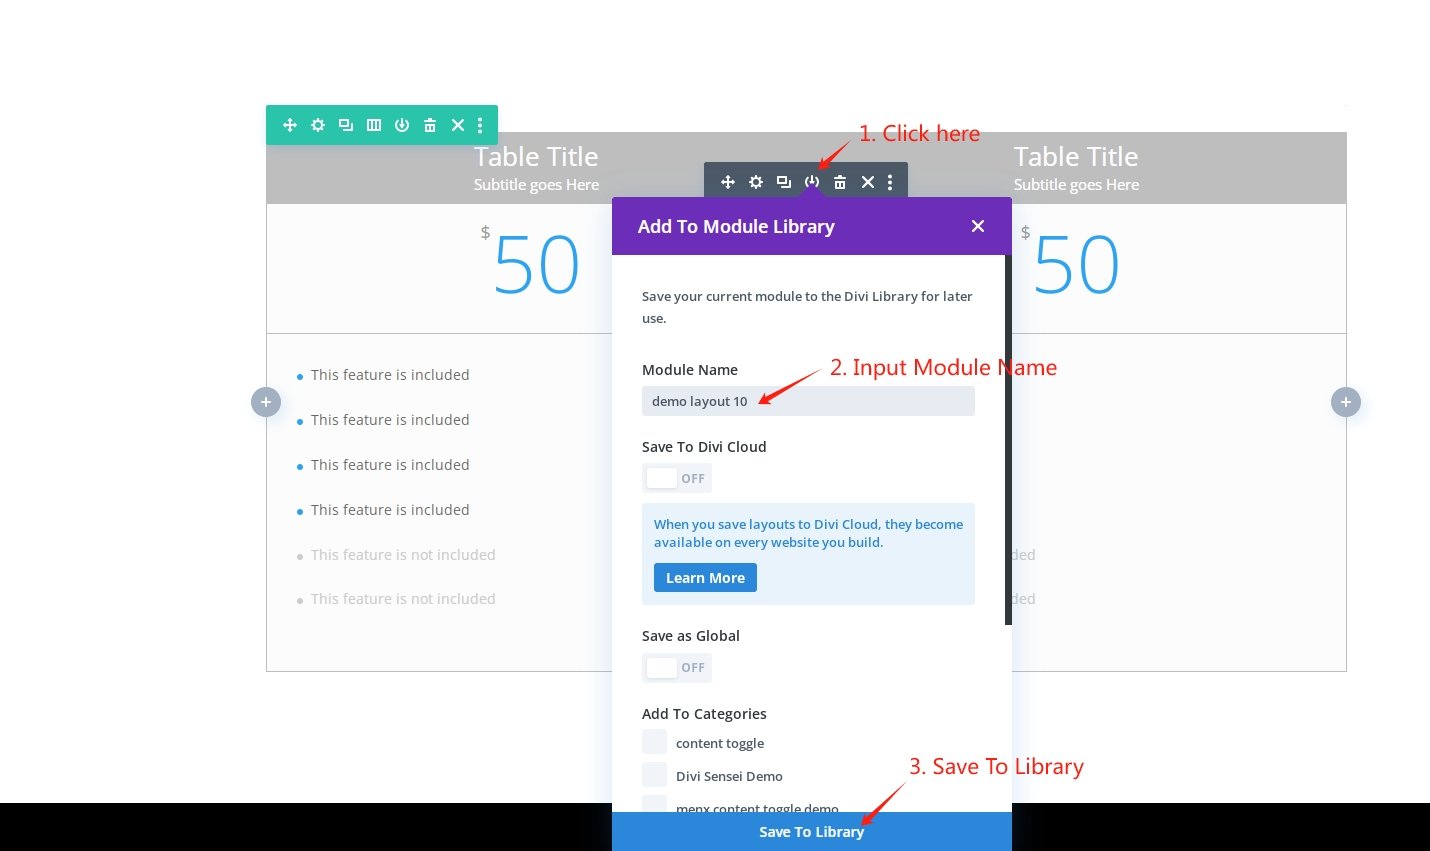
Click the dark plus button to add a new module. Then create the layout from Divi Module layout by yourself.

Save the layout and Add To Module Library. Then you can import it to the content left or right layout in Content Toggle module.
How to edit Content Layout
Content Layout width
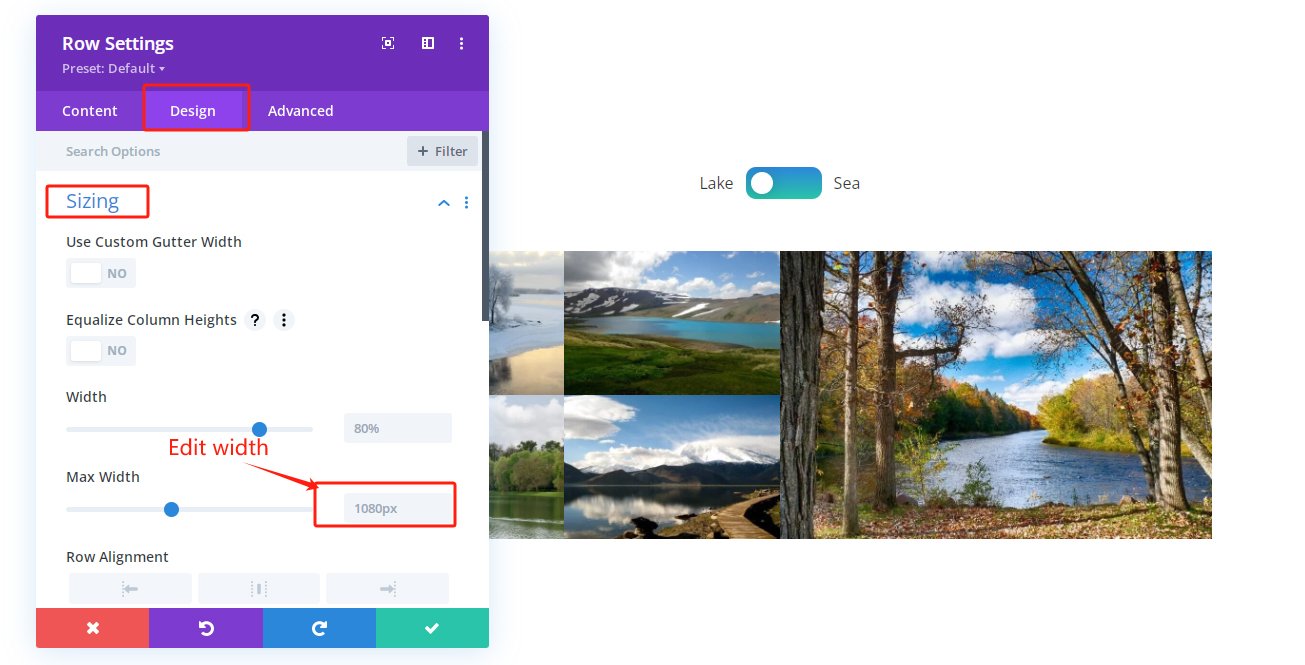
The max width of layout in plugin is 1080px.
If you need to use a layout width greater than 1080px, edit the Max Width of the content toggle module row to make your layout display properly.
Go to Row Settings>>Design>>Sizing>>Max Width>>edit
Content Left Layout
Before usage of the layout switching module, you’d better create your layout from Divi Row and then save the layouts to use in the module.
For width of layouts to display normally,
Suggest setting the Row Width of your layout to 100%.
Please refer to:
Content Left Layout Settings
Firstly, refresh the website if you have edited the layout.
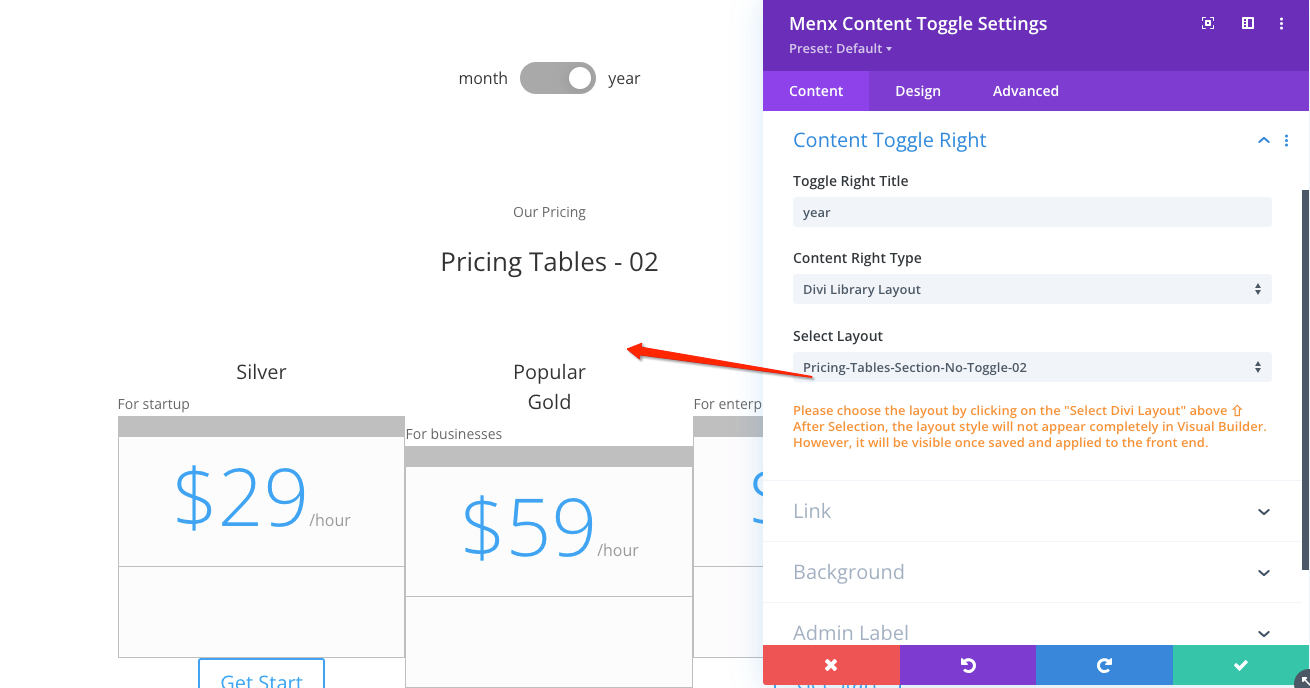
Secondly, go to Content >> Content Toggle Left in Module Settings, select Divi Library Layout in Content Left Type. Click Select Divi Layout in Select Layout, then browse layouts in your Divi library and choose which you want to show.
After being loaded into the module, the layout style will not appear completely in Visual Builder Backend ↑
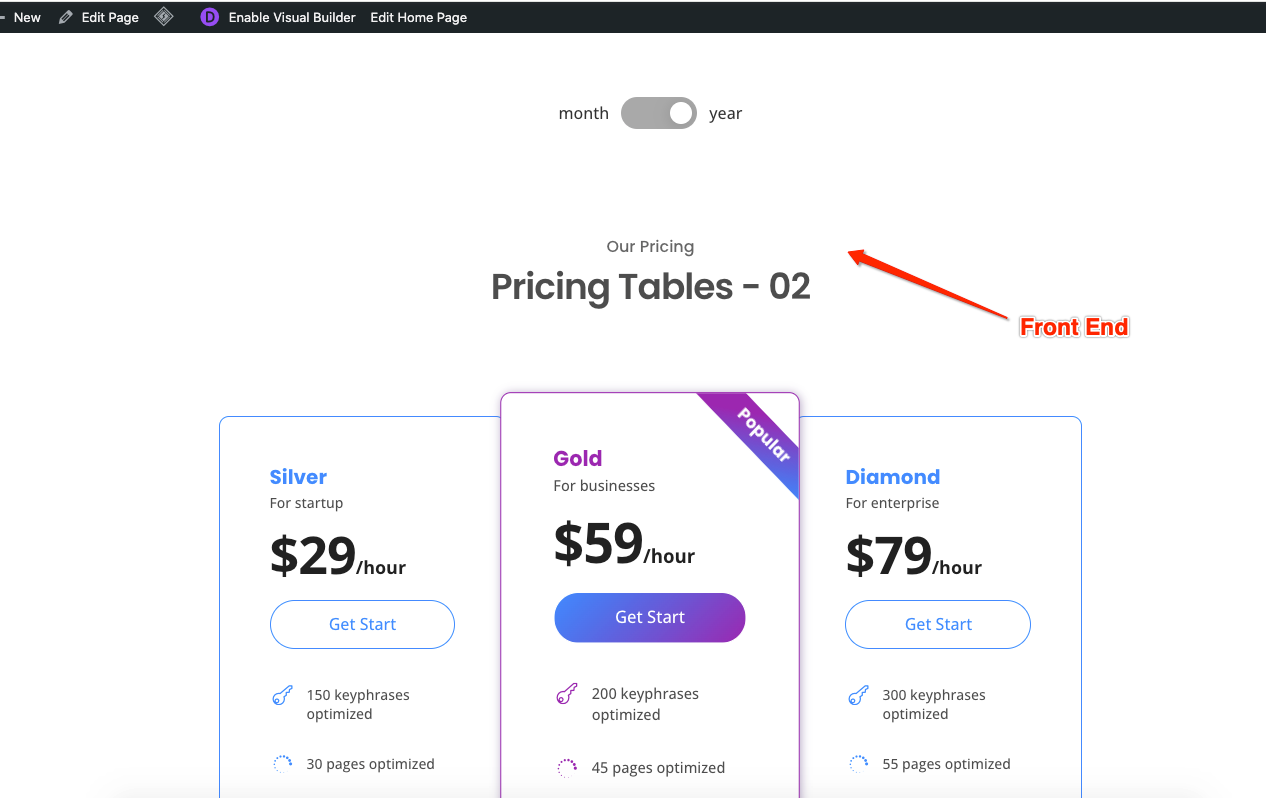
However, it will be fully visible once saved and applied to the front end↓
Content Right Layout
Before usage of the layout switching module, you’d better create your layout from Divi Row and then save the layouts to use in the module.
For width of layouts to display normally,
Suggest setting the Row Width of your layout to 100%.
Please refer to:
Content Right Layout Settings
Firstly, refresh the website if you have edited the layout.
Seondly, go to Content >> Content Toggle Right in Module Settings, select Divi Library Layout in Content Right Type. Click Select Divi Layout in Select Layout, then browse layouts in your Divi library and choose which you want to show.
Click Toggle Switch to right side, then you can see the Divi layout imported.
After being loaded into the module, the layout style will not appear completely in Visual Builder Backend ↑
However, it will be fully visible once saved and applied to the front end↓
How to edit Content Style
Set Content Left style
Go to Design >> Content Left Style in Module Settings, then edit padding, margin, background color & Hover, border, box-shadow
Set Content Right style
Click Toggle Switch to right side.
Go to Design >> Content Right Style in Module Settings, then edit padding, margin, background color & Hover, border, box-shadow
How to edit Content Animation
Go to Design >> Content Toggle Animation in Module Settings, then edit the animation para to enable the animations for the content when toggle switching: animation style, animation duration, animation direction, animation start opacity, animation speed curve.
Toggle Switch Style Setting Cases
FAQ
My layout becomes narrower after loading into the module. What should I do?
The reason of display width becoming narrower is that the max width of layout in content toggle plugin is 1080px.
If you need to use a layout width greater than 1080px, edit the Max Width of the content toggle module row to make your layout display properly.
Go to Row Settings>>Design>>Sizing>>Max Width

Also, for width of layouts to display normally, suggest setting the Width of your layout row to 100% if you want to create the layout from Divi Row layout.
Please refer:

After my layout is loaded into the module, its styles are not fully displayed in the backend. What should I do?
The reason of not fully displayed of the layout styles is backend loading system. So we can not solve it.
However, it will be fully visible once saved and applied to the front end.
LAYOUT in the Visual Builder backend (not fully displayed) ↓
LAYOUT in the front end (fully visible) ↓
After modifying the layout content, the front-end page displays abnormally. How can I deal with it?
The reason of abnormal display of front-end page after modifying is browser cache issues.
First, try refreshing the page to see if it displays normally.
Secondly, if refreshing doesn’t solve the problem, you can fix this problem by clearing browsing data:
For chrome:
Go to Settings > Privacy and Security> Clearing browsing data.> In the time range, select “All time” > click clear.
For Safari on Mac:
Go to History tab in the top menu > Clear History…> In the time range, choose “All History.” > Click Clear History.
For IE:
Go to the Tools menu (gear icon) > Internet Options > General tab > Browsing History > click the Delete button.> Select the “History” checkbox > click the Delete button.


